Week 12: Final reflections

So today was our last class in the course. During the class we discussed some other useful web publishing websites we can use for future projects. We also went over some housekeeping on our blogs before the submission deadline. We had a look at some features like presenting our images in gallery’s and using a recent posts widget on our blog page.

Over all I have really enjoyed the module and have a learnt alot of very useful skills. I found the practical part of this module very interesting and the fact that we had freedom to approach the tasks in our own way was, very beneficial.

I now have a better understanding of the pros and cons of social media and I now know how to utilise their full potential. The importance of what you post online and how you protect your information online is more important than ever, so learning about these topics has been very beneficial.

I thoroughly enjoyed making the podcast and prezi and will continue to use these applications.

My favourite part of the module was the digital photography aspect. I have always had an interest in photography and now that interest has grown as I have learned a number of new techniques and methods. I also really enjoyed editing and repairing images using Picasa and  Photoshop.

Thanks for reading.

Week 11: Copyright

copyrightThis weeks class was all about copyright and navigating the digital commons. The concept of copyright is enforced by most governments worldwide. It legally allows the creator of an original work, exclusive rights to that work. (usually for a limited time). It is a form of intellectual property, as it prevents other people from using, changing or profiting from the work. The creator can allow other people to use or adapt the work, but they must have permission from the creator and the creator has the right to be credited fr it.

Next we looked at underlying & Derivative works. A derivative work is when someone creates a new work based off a copyrighted work. It will include several copyrighted elements, however because it is different from the original it in some cases can be considered a separate work. So this new work can only be itself copyrighted for the original elements and not for Its non-original aspects. Examples of this include the ‘Mona Lisa’ painting, Movies and Music.

We then moved on to discuss Fair use and Public Domain. Fair use is when the copyright owner of some content grants the exclusive right of the content to someone else. It legally allows someone to include another authors work in their own. It is most commonly found in news reports,research and library archiving. The public domain refers to non-copyrighted material or works with copyrights that have expired or where not applicable. The most common example of this is Shakespeare’s work.

We also discussed privacy vs. the expression of freedom, in terms of where you can cant take pictures and the concept of the commons, which is similar to the public domain as it includes material that can be used freely by all. We also looked at the protection and copyrighting of DVDs and the laws that enforce these rules. CSS stands for Content-Scrambling System and is used to protect the data on DVDs. this lead to the developemnt and creation of DeCSS whiscj is a computer program capable of decrypting content on a commercially produced DVD video disc. This lead to a significant amount of piracy and breech of copyright and resulted in several large court cases in the mid-nineties. We finished the lecture off by looking at some examples of  websites that provide  free material including images, music and advice.

Our task this week was to properly cite all images, quotes and references in our blog posts and to ensure all work we used is appropriately credited. To ensure this, I went through my blog and added citations to any images I used that where not in the public domain.

Citation:

copyright.jpg. Retrieved from http://canprint3d.com/can-you-get-into-copyright-trouble-for-3d-printing/

Week 10: Search Engine Optimisation

seo

This weeks class was all about SEO (Search Engine optimisation).  SEO involves improving a website or webpages visibility in search engines result pages by changing layout of content and the sites language. We refer to ‘search engines result pages’ as SERPS. This can be achieved by using HTML meta-tags as HTML allows you to use keywords to highlight areas of your page. Sites like WordPress have features to allow you to do this. Search engines index websites by their use of keywords and search terms and then this index is used as a ranking system to determine which websites should be listed highest in the results page. This means that you can move your website higher in the results by using keywords and highlighting your page.

Next we looked at organic SEO which involves methods of generating more traffic to your website without paying, like social media campaigns i.e. Facebook pages and Twitter accounts. There are also a number of non-organic methods that will cost you, like Search Engine Marketing which involves paying someone to use AdWords, and Pay-per-click programmes to increase the traffic to your site.

We then moved on to Keyword research which is a method of research used to find the terms people use to search on the internet. It involves matching the language used to that of your target audience. We then discussed the ways to implement this method and the different techniques including the use of:

  • Google AdWords Keyword Planner: Allows you to Estimate the volume of searches in the last month for your keywords and specify their location, words to exclude,and related terms.
  • WordTracker: Is an independent service, with a free Firefox Add-on that allows you to analyse similar data as ‘Keyword Planner’.

seo GWe also looked at Google Webmaster Tools and what we can learn from them, including:

  • How many crawl errors have you had?
  • How many of your pages are indexed?
  •  Is there malware on your site?
  •  Is your XML sitemap working?
  •  Who links to you (backlinks)?
  • What keywords are detected for your site?

So our task this week was to explore these different tools and to make changes to our pages in order to improve SEO and to optimize all aspects of our page.

Citation:

SEO.jpg . Retrieved from http://www.gmanwebdesign.com/seo.html

GoogleSEO.jpg . Retrieved from http://www.business2community.com/seo/dos-donts-seo-easiest-way-appear-google-0658257

Week 9: Social media tools

Social Media Logotype Background

This week in class we discussed social media tools and how they can be used as promotional tools. Also we looked at social media that can be integrated with our blog. We started out by discussing what social media is, its role in society and how we use it. we discussed numerous social media sites and there purpose, including Facebook, Twitter, LinkedIn and Flickr to name a few.

downloadFor our lab time this week we had to add a Facebook page Like box and a Twitter feeds widget to our Blog’s sidebar. In order to do this, I created a new Facebook page for my blog and linked it with the widget on my blog. I then added the Twitter widget. We also had to ensure our sharing setting were enabled on WordPress and we had time to explore the other widgets on WordPress. Our final task for our lab time was to read about protecting our online privacy with the Crypto Party Handbook. The website offers people to service of learning  how to use basic cryptography tools.

Also this week I started taken pictures for my portfolio. I haven’t picked a definite theme yet, so this week I was taken all types of images in order to help me narrow down the theme I want to use.

Citation:

social media.jpg  Retrieved from http://impact4roi.nl/diensten/online-promotie/pr/

social media like.jpg . Retrieved from http://theurbanmama.com/articles/modern-vs-traditional-way-of-communicating.html

Week 8: Digital image management

Awesome-Screenshot-google-chromeThis week in class we started by talking about screen capturing and different ways to do it. I use an extension on Google Chrome which allows you to capture either the full screen or part of it. It is easy to use and very convenient.  The extension is called ‘awesome screenshot’.

Next we moved on to look at image formats. Image files are either made up of pixels or vector data or a combination of both. The most common is a bitmap image, which is a dot matrix data structure which represents an image using a grid of pixels.

When it comes to saving images there are two different ways. You can save the image as an uncompressed file, which will be very big but will have good quality. examples of uncompressed formats include: PSD, TIFF & DNG.                                                                                            Alternatively you could save the image as a compressed file which will be smaller in size but will be of lower quality. Examples include: GIF, PNG & JPG.

The most common image format used is JPG/JPEG  (Joint Photographic Experts Group). It creates very small images that be emailed and posted online making it a very convenient format, also most cameras can save images in a JPG format. Even though it is a compressed image format, the quality remains relatively unchanged, unless it is repeatedly edited and saved, this can lead to generational degradation.

We then talked about EXIF data, which is a specification which allows you to add tags to images.  There is a host of sites that allow you view the EXIF data and there are also sites that will allow you to remove EXIF data as it could lead to privacy issues, seeing as the data can include information about when and where the image was taken.

We finished the lecture by discussing our final assignment, which involves us taking a collection of 6 images with a common theme. We our expected to use all the skills and processes we have developed over the duration of the course. Finally Niall showed us some examples of famous photographers work in order to give us some inspiration for the task.

Citation:

Awesome screenshot.jpg . Retrieved from http://www.freemake.com/blog/best-google-chrome-extensions-of-2013/

Week 7: Digital Presentation

preziThis weeks we were working on making a digital presentation using Prezi for our second assignment. Prezi is  a free website that allows you to create fun and imaginative presentations. Our task is to create a Prezi based on some of our experiences from the course so far. For my presentation I am going to do it on photography, because it is an area of this module that I have found fun and interesting, Also we have had a number of photographic that I can discuss.

During class we discussed the other Digital presentation programmes which include Powerpoint, Keynote, Open Office, Google Docs and Slideshare. All of these programmes allow you create a digital presentation, however only Prezi allows you to do it in a completely unique and unorthodox manner.

popcorn_webmaker_orgAfter we went through the different features of Prezi, we looked at another tool called Popcorn Maker. It allows you to mash up different websites like Flickr, Google Maps and YouTube Videos.

We also looked at Screenr which allows you make a screencast of what you are working on and you can then use Popcorn Maker to mash up you video and you can post it on YouTube.

That’s all for this week I will post my Prezi soon.

Week 6: Restoring images

This week is class we looked at restoring images and the different software we can use to achieve this. During class we looked at Photoshop, Gimp and Picasa. All of these program’s can be used to edit, manipulate and restore images. We discussed how in recent times the phrase photo-shopped has become part of our vocabulary. An image that looks any way altered or unrealistic is labelled as photo-shopped.

This weeks task is to choose an image from Retouch Pro and attempt to restore it. For this task i choose to download and use Picasa to edit my image. I re-touched, cropped and adjusted the lighting in my image, in order to restore it to its former quality.

I found using Picasa for this task, to do be very easy and enjoyable. It allows you to edit your image freely and you can undo any changes to the image at any stage. I will post before and after images for you to see how I got on.

Before:

Original image

After:

Retouch image


Week 5: Publishing our podcast.

In this weeks class we looked at editing our podcast, in order to get it ready to publish on our blog. Firstly we talked about podcast’s and RSS feeds, then we moved on to podomatic.

Podomatic is a free hosting service which allows you upload your MP3 file and it will handle the band width and automatically produce your RSS feed for you. So I created an account and I will use it to upload my podcast and link to it from my blog. After this looked at ensuring our RSS feed was valid.

Next we looked at how to submit our podcasts onto iTunes and how to subscribe to the feed. The use of podomatic makes the process of submitting your mp3 file onto iTunes alot easier.

Photographic task.

Our photographic task for this week is to demonstrate the difference between landscape and portrait pictures and explain why one is more appropriate  for certain targets. To demonstrate this i took two pictures of me and my dog while out for a walk. One in landscape and one in portrait. Here’s how it turned out:

IMAG0196Firstly here is the example of my landscape picture. In this case i think the use of landscape is less effective as portrait because it crops the background and includes scenery either side of the target, that doesn’t add much to the image.


IMAG0197Secondly is my portrait picture. I think the use of portrait provides a much nicer image. It includes a clear background and the target  is well placed in the center of the image. In my landscape portrait, the target (me and my dog Arnie) are cramped into the photo. Landscape would be more appropriate for a shot of the lake itself.

That’s all for this week, my podcast will be posted shortly.

Week 4 : Audio and shutter speed

Picture1This weeks lecture started off by looking at audio recordings. and how to capture and edit them. We then talked about audio format files which is a file used to store audio data on a PC, these files can be uncompressed or compressed. The difference being that uncompressed files are bigger and are better quality and compressed are smaller files but the quality is not as good. This led us to talk about the different audio formats which include MP3, WAV,  AIFF and OGG. Where MP3 is the most common format of audio files on audio devices. WAV was designed by windows and is standard on windows computers and AIFF and OGG were developed by apple and are standard on their machines.

Next we moved on to talk about how to capture a quality recording. Firstly, using digital devices is much more convenient than analogue devices as you can edit the digital file straight away and a analogue recording would have to be re-recorded with a digital device.  We then talked about ambient noise (background noise) and how to reduce it. Sound bounces of hard surfaces, so recording in  a room with soft furnishing will provide less ambient noise. We then moved on to the subject of our recording. We can either discuss our photographic task or recite a poem or read a book review.  We also looked at a range of different recording devices including: Dictaphone, microphone, smartphone and MP3 recorder.

Picture2

For the second half of the lecture, Niall introduced us to Audacity. Audacity is a free, open source software for recording and editing sounds. We will be using it to edit our audio podcasts. We finished the lecture off by exploring the options and different features that audacity has to offer.

Shutter Speed Task.

This week our photographic task was to take a picture demonstrating the difference between slow shutter speed and fast shutter speed. To achieve this i got my camera and rolled an apple across the floor in my hall, capturing it with both slow and fast shutter speeds. Here’s how it looked :

Slow shutter speed.

photo 2

photo 1

Fast shutter speed.

photo 3

photo 4

After that i switched to a rugby ball and made it the main focus of the shot, as the apple wasn’t big enough. Here’s how it looked:

Slow shutter speed. 

photo 2 (1) photo 3 (1)

Fast shutter speed.

photo 1 (1) photo 4 (1)

Week 3 Photography

This weeks class was all about photography and cameras. We covered the following topics in class:

• The history of photography
• The camera workings
• How to take a better picture
• Camera types, limitations and benefits

Firstly we talked about the history of photography and we looked at camera obscura. Camera obscura is a visual effect where an image from outside a room is projected in reverse onto the opposite wall of a darkened room. we also talked about how photography has evolved over the years, becoming easier and cheaper

Next we talked about the camera workings. firstly we talked about camera aperture. This is the part of the camera that light passes through.  The aperture is measured using f-stops. the amount of f-stops affects the depth of focus in an image, so the more f-stops the deeper the depth of focus and vice versa.

camera-aperture

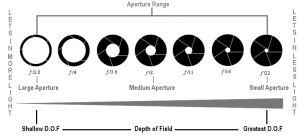
Next we looked at ‘Depth of field’ which can used to isolate certain people, objects and text. By opening the aperture more or less you can focus on either scenes or single objects.

gnome-dof

After that we looked at shutter speed. the speed in which the shutter on your camera opens and closes determines the quality of the photo. When it is open for a long time, more light gets in and the quality of the photo will not be as good as a camera with a faster shutter speed. Slow shutter speeds will blur moving objects, only capturing still objects, while fast shutter speeds can capture a single droplet hitting the ground.fastshutterspeed

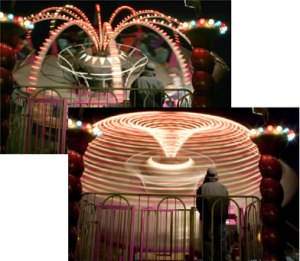
Next we talked about taking better photos and camera types and there limitations. Here is the list from class, of factors that affect image quality:

What affects image quality?
• Quality of CCD/Mega-pixels
• Good lighting of a subject
• Proper focus and exposure
• Image clarity (lack of blur due to camera
shake or incorrect shutter speed)
• Shooting at the highest resolution and
quality available (camera settings)
• Composition

We then looked at composition, which takes a number of aspects into consideration. It ensures you a have a clear subject of focus and in order to get the best image you must be willing to zoom in or out, change your position, consider the background (is it cluttered), try both landscape and portrait and to try include geometric shapes or other features in order to enhance the image.

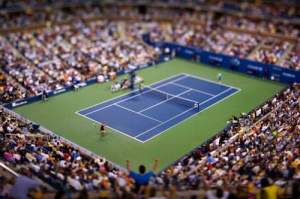
Coming to end of the lecture we looked at different styles of photography, my favourite being ‘Tilt shift’ . This technique makes people and places look like miniature models. I think using tilt shift is a really exciting way to take photos and the possibilities  are endless. here are some examples of my favourite tilt shift images.

tennis

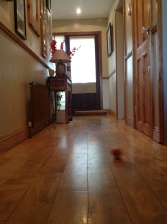
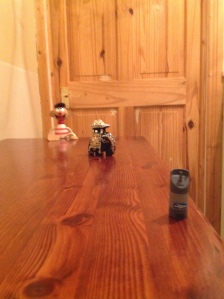
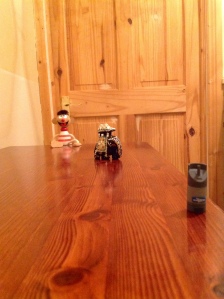
Finally this week for our lab we had to take a before and after photo to show we understand how a change of aperture affects an image. To achieve this I used the camera on my ipad. I set up  three objects and firstly took a picture without changing the settings or allowing the camera to properly focus. For my after picture I adjusted the setting to give me the best quality picture and focus the camera to target the middle object. Here’s how it turned out.

Before

photo 1

After

photo 2

To finish up this week’s post here’s a before and after photo of one of my dog’s. For the after photo i adjusted the lighting and enhanced the definition of the shot.

Before

photo 1 (1)

After

photo 2 (1)

Citation:

aperture.jpg.  Retrieved from http://tallijacobs.blogspot.ie/

Gnome.jpg . Retrieved from http://www.orble.com/apertures/

tennis.jpg .  Retrieved from http://fineart.laforetvisuals.com/Life/27/